Hi friends. We have a great DIY article this week from Scott, Easy DIY Domino Holders. If you love playing domino’s or know someone who does, this is a great DIY project to make!!
*Note: This post contains affiliate links, so we may earn a small commission when you make a purchase through links on our site at no additional cost to you.
EASY DIY DOMINO HOLDERS

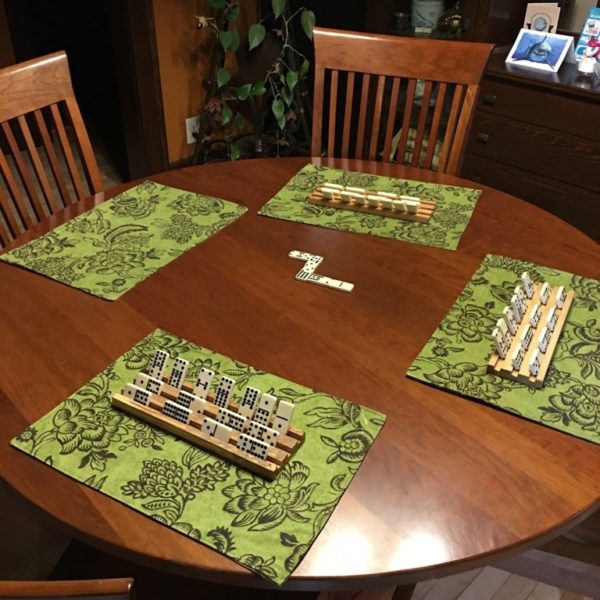
This Easy DIY Domino Holders project only requires a few power tools and finish of your choice.
A friend asked me one day to make him some domino holders. I must have looked a little puzzled so he began explaining what he wanted. I recognized this as a fun and easy project so I agreed to make them and the rest is history.
List of tools and materials for this project
Tools
Table saw
Stack Dado blade
Planer
Sander
Wood
Reclaimed hardwood pallets
Finish
Minwax Antique Oil
So, on to the materials for this project. Either soft or hardwood is acceptable for this project and should hold up to the most enthusiastic domino player you know. If you are buying dimensional lumber then look at a 4” wide board at a length that will provide the quantity you want to make (divide the overall length by twelve inches).
For this project, I took the cheap and easy way out for materials. I have a nice pile of hardwood boards reclaimed from skids and thought this would be a great project for this often overlooked supply.

A look at some of the boards before any milling. You can see the twist in a couple that had to be removed.
One caveat when using this type of board is you basically are working with rough cut lumber. It will not have straight edges and will have cupping warp or twist. I am lucky to have a shop full of tools so it was an easy choice.
Even with the issues of using this wood you can address them with a few simple hand tools because the finished pieces are only 1 foot long. Several options are a belt sander, a hand plane (for the really ambitious) or a powered hand plane. For those of you who are fortunate enough to have more tools, a power planer or jointer makes this project that much easier.
To start, I cut the length of one side on the table saw to get a straight edge. Don’t worry if it’s not perfect as you will square the cuts later when cutting them to final length. After this is done, you can cut the lengths to 12” each. Then plane, sand or joint the boards flat and similar in thickness.

Now that you have uniform pieces, we can finish squaring the sides. If using dimensional lumber direct from the store, you can skip this step and just cut to final length. Place the long side that was ripped on the table saw against your miter guide, this is your reference side. Cut your first side so that you take off approximately half a blade width.
This should square the end to your reference side, repeat for all of the pieces you cut. Set up your fence to 11 ¾”, flip the boards and place the reference side against your miter gage again.
Cut all pieces this way to get your final length.
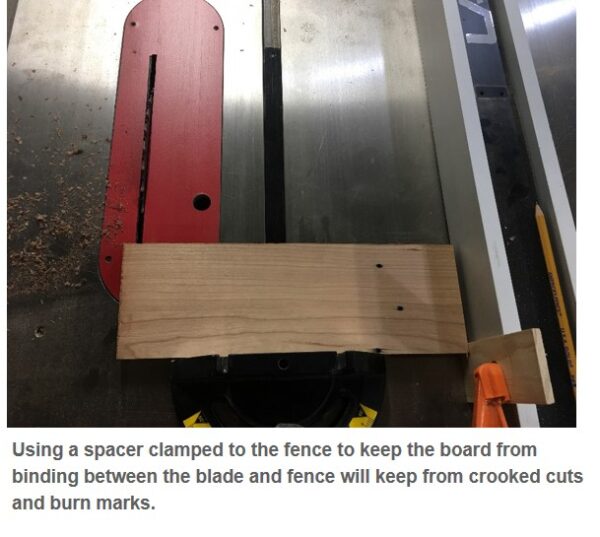
Hint: put a short spacer against the fence and adjust your distance from the blade for a final length of 11 ¾”. It will keep your board from binding between the blade and the fence.
The last step for final dimensions is to rip the last side. Set your fence to 3 ½”. Place the side originally ripped against the fence (also used as the reference side on the two end cuts) and rip all the boards. Your boards should all be the same size at final dimensions.

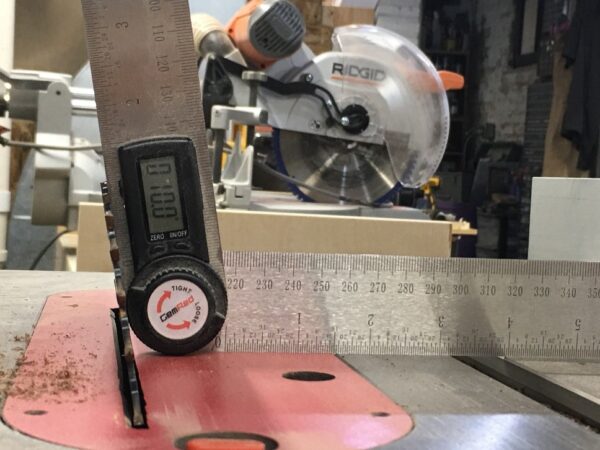
At this point we can set the fence and blade angel for cutting the groves that hold the dominoes. Set the blade to a 10-degree angle and set to a dept of 3/8”. The width of the grooves is 3/8”. I used a stack dado which makes it easy to cut in one pass and the bottom angle follows the 10-degree angle of the saw blade. You can use a standard rip blade to cut the grooves and either adjust the fence to get the 3/8” width or use spacers between the fence and piece you are cutting so you don’t have to reset the fence.
One difference you will notice using a single blade is how the bottom turns out. A single ripping blade will be at the same depth for each cut across the width so the bottom will not be angled and there will be ridges. You can use a hand chisel to pare out the ridges or you can leave them and just sand the sharp edges down.

Set your fence to cut 5/8” from the long edge of the board. Cut all your boards at once with the dado blade to get consistency in the first grooves location. Reset your fence to cut at approximately 1” and cut all boards again for the middle grooves. Reset the fence one more time to cut at 1 3/4”. This should give you even spacing around ½” between grooves and the edges, cut all the boards and you are done.
Sand all the pieces using 120 grit to take of all the sharp edges and until you are satisfied with the quality of the surfaces. If you like a really smooth surface you can sand with 220 grit but it is not necessary.
Finish with your favorite choice of finish and allow to dry completely. Sand between coats and wipe of sanding dust before the next application. Allow to dry completely and you are finished! I applied Minwax Antique Oil. It is easy to apply and I like the low gloss sheen and warm color it provides. The wood looks natural but is protected better as the oil penetrates rather than coats the surface only.

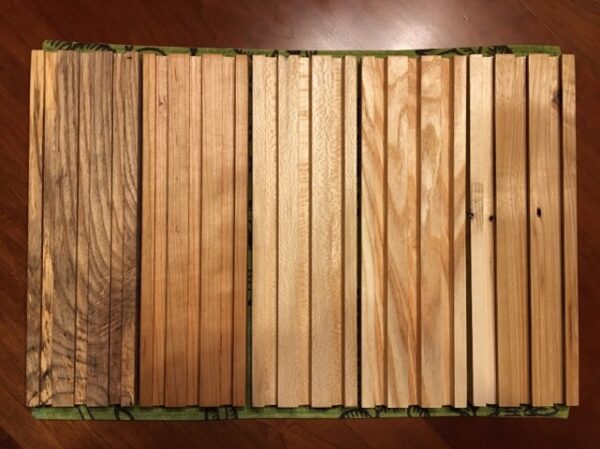
Wood species in order from left to right: Spalted Maple, Cherry, Maple, Oak, Maple
One last option is to place felt pads on the bottom if you want to keep from scratching any sensitive surfaces you play on. ¼” round felt bumper work great and can be found in any home store.
If you liked Easy DIY Domino Holders, check out the DIY page where you can find a variety of fun DIY projects you can do on a rainy day or if your looking to make a gift for someone.
Crayola
Crayola has a variety of different fun ideas to do!! You can print free coloring pages, pick from their DIY projects, or pick from their craft kits!! So many different options here.

How cute! My grandma likes dominos, this would be a good project to make for her.
Thanks Claire!! Thanks for your comment!! We hope it gives others ideas for fun things to make. 🙂